WordPress Admin Options Page for Site Management
Creating a WordPress Admin Options Page allows you to centralize and manage various settings, enhancing the customization of your website.
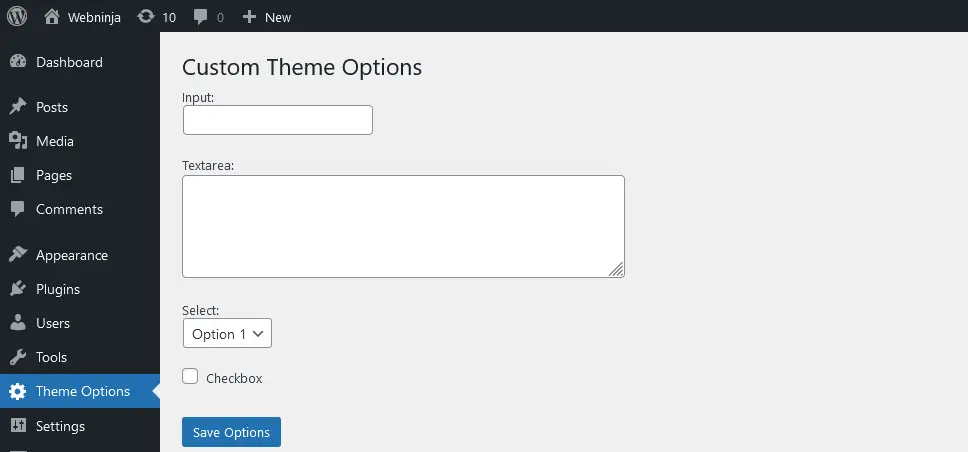
We will be creating a page in the admin settings to manage the website like this:
Here’s an example demonstrating the use of these functions in a WordPress theme’s function.php or plugin file:
Step 1 – Function to add Admin Options Page
function custom_theme_options_page() {
    add_menu_page(
        'Theme Options', // Page Title
        'Theme Options', // Menu Title
        'manage_options', // Capability
        'theme-options', // Menu Slug
        'custom_theme_options_content', // Callback Function
        'dashicons-admin-generic', // Icon URL
        80 // Position
    );
}
add_action('admin_menu', 'custom_theme_options_page');
This code defines a custom theme options page for a WordPress theme. The page is added to the admin menu using the add_menu_page function, which takes several parameters:
Page Title: The title of the page, which appears in the menu.Menu Title: The title of the menu item, which appears in the admin menu.Capability: The capability required to access the page.Menu Slug: The slug of the menu item, which is used to identify the page in the admin menu.Callback Function: The function that is called when the page is accessed. In this case, the callback function iscustom_theme_options_content.Icon URL: The URL of the icon that is displayed next to the menu item in the admin menu.Position: The position of the menu item in the admin menu.
The add_action function is used to add the custom theme options page to the admin menu.
Step 2 – Function to display content on Admin Options Page
// Function to display content on Admin Options Page
function custom_theme_options_content() {
    ?>
    <div class="wrap">
        <h2>Custom Theme Options</h2>
        <form method="post" action="options.php">
            <label for="input_id">Input:</label><br>
            <input type="text" id="input_id" name="input_id" value="<?php echo esc_attr(get_option('input_id')); ?>">
			<br><br>
            <label for="textarea_id">Textarea:</label><br>
            <textarea id="textarea_id" name="textarea_id" rows="4" cols="50"><?php echo esc_textarea(get_option('textarea_id')); ?></textarea>
			<br><br>
			<label for="select_id">Select:</label><br>
            <select id="select_id" name="select_id">
                <option value="option1" <?php selected(get_option('select_id'), 'option1'); ?>>Option 1</option>
                <option value="option2" <?php selected(get_option('select_id'), 'option2'); ?>>Option 2</option>
                <option value="option3" <?php selected(get_option('select_id'), 'option3'); ?>>Option 3</option>
            </select>
            <br><br>
            <input type="checkbox" id="checkbox_id" name="checkbox_id" value="1" <?php checked(get_option('checkbox_id'), 1); ?>>
            <label for="checkbox_id">Checkbox</label>
            <?php
                settings_fields('theme_options_group');
                do_settings_sections('theme_options_section');
                submit_button('Save Options');
            ?>
        </form>
    </div>
    <?php
}
This code defines a custom theme options page for a WordPress theme. The page includes a form with several fields.
The code also defines an action hook to add the custom theme options page to the WordPress admin menu. The page is added to the “Appearance” menu, and the menu item is displayed with the label “Custom Theme Options”.
Step 3 – Function to register and add settings
function custom_theme_register_settings() {
    register_setting('theme_options_group', 'input_id');
	register_setting('theme_options_group', 'textarea_id');
	register_setting('theme_options_group', 'select_id');
    register_setting('theme_options_group', 'checkbox_id');
    add_settings_section('theme_options_section', 'Custom Theme Settings', 'custom_theme_section_callback', 'theme_options_page');
}
add_action('admin_init', 'custom_theme_register_settings');
This code defines a function called custom_theme_register_settings that registers custom theme settings with WordPress. The function registers four settings:
input_idtextarea_idselect_idcheckbox_id
Each setting is registered with a specific group name (theme_options_group) and a unique ID (input_id, textarea_id, select_id, checkbox_id).
The function also adds a settings section called theme_options_section with a callback function called custom_theme_section_callback. The settings section is associated with the theme_options_page page.
The code uses the add_action function to call the custom_theme_register_settings function at the admin_init hook, which is used to initialize the admin area of the WordPress site.
The field values in your template
To display all the field values in your template, you can use the following code:
$input_value = get_option('input_id');
$textarea_value = get_option('textarea_id');
$selected_option = get_option('select_id');
$checkbox_value = get_option('checkbox_id');

echo 'Input Value: ' . $input_value;
echo 'Textarea Value: ' . $textarea_value;
echo 'Selected Option: ' . $selected_option;
echo 'Checkbox Value: ' . ($checkbox_value == 1 ? 'Checked' : 'Unchecked');
This code retrieves the values from the fields “select_id1”, “checkbox_id1”, and “textarea_id1” using the get_option() function and displays them on your template page. You can further customize this code to format the output of the values according to your needs.
As mentioned earlier, this versatile tool can also be utilized practically for implementing features like enabling and disabling Maintenance Mode with ease. By leveraging the Options Page, you can seamlessly toggle Maintenance Mode on or off, ensuring a smooth transition during site updates or improvements.
Empower yourself with the knowledge to build and customize a WordPress Admin Options Page tailored to your specific needs. Enhance your site’s functionality and streamline maintenance processes effortlessly. Dive into the world of WordPress Admin Options Pages and elevate your website management experience today.